Decorative Finish: Abuiquiu

Abuiquiu by Lenehan Studios
DECORATIVE FINISH HOW-TO

Abuiquiu

Artist: Lenehan Studios

Share this article

PROJECT SUPPLIES:

INSTRUCTIONS:

1 | Basecoat in satin finish latex paint SW Alabaster.

2 | Brush on Glass Bead Undercoat thinned with water.

3 | Stencil on design using GPW Metallic Silver. Let dry.
(Photo 1)

4 | Mix the Glass Bead Gel XL with silver and gold glitter and trowel over entire surface.
(Photo 2)

5 | Pull tape before the Glass Bead Gel dries. Here is the completed finish.
(Photo 3)

Featured Products

About the Artist
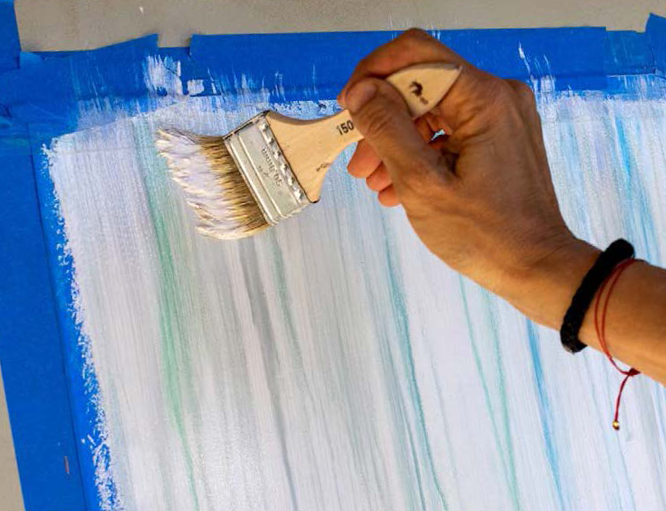
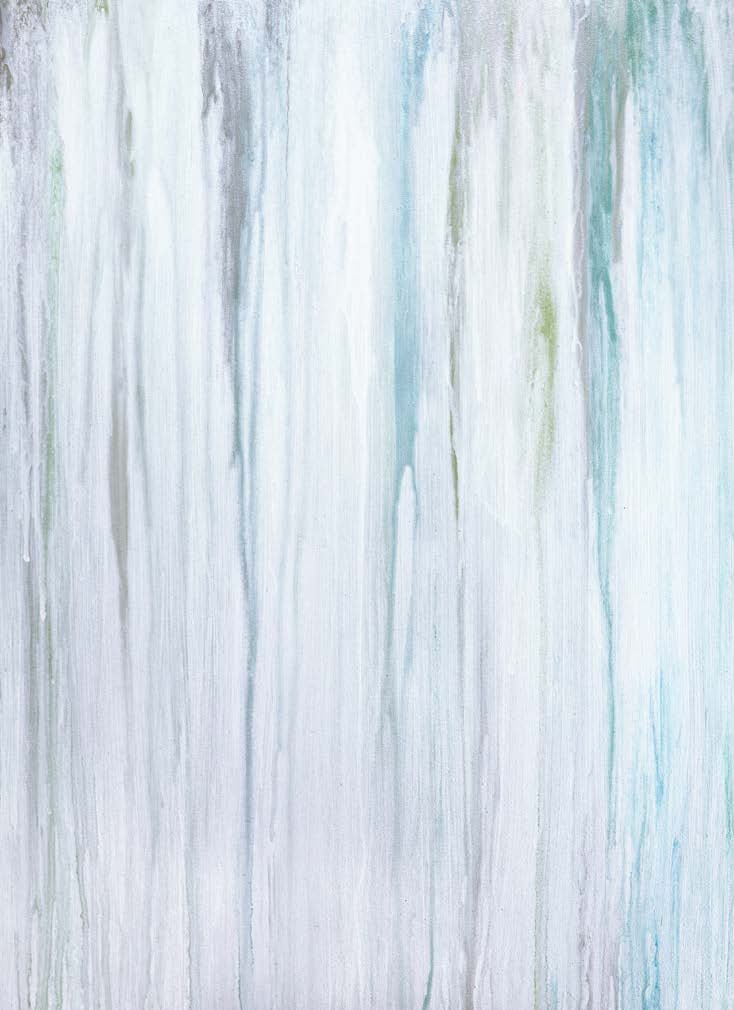
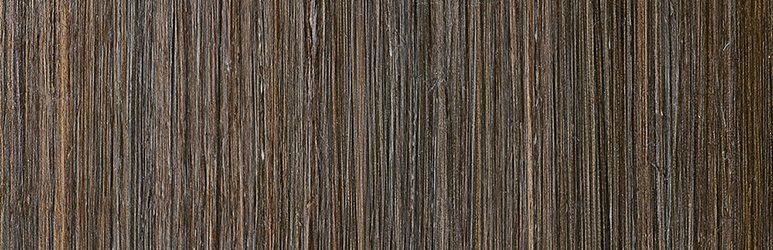
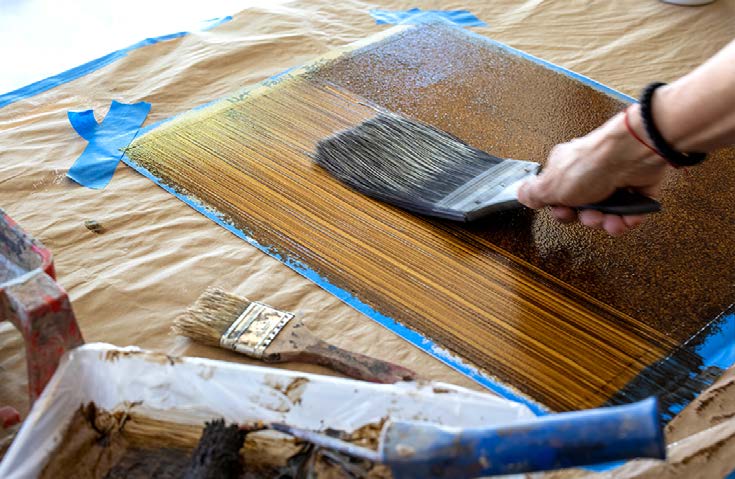
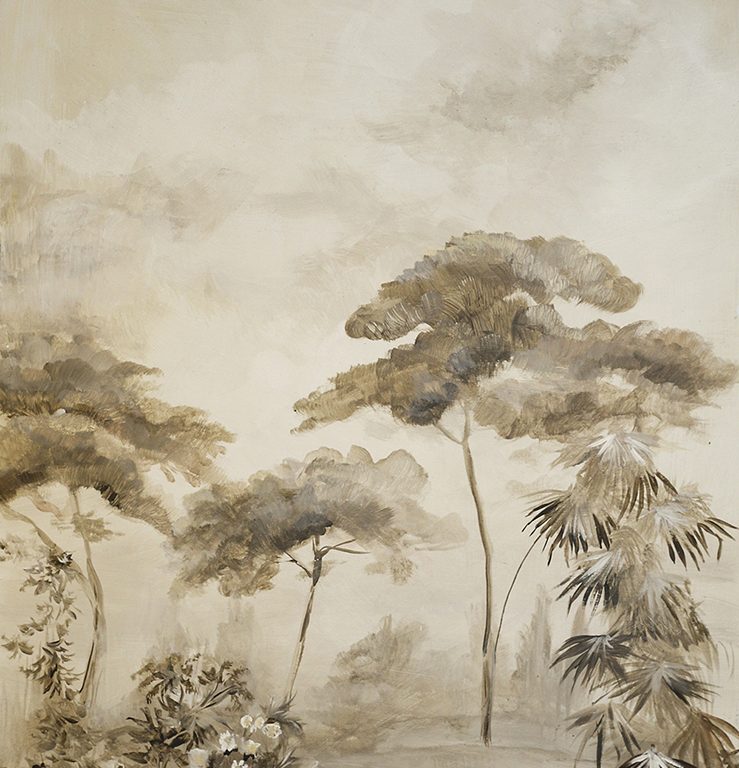
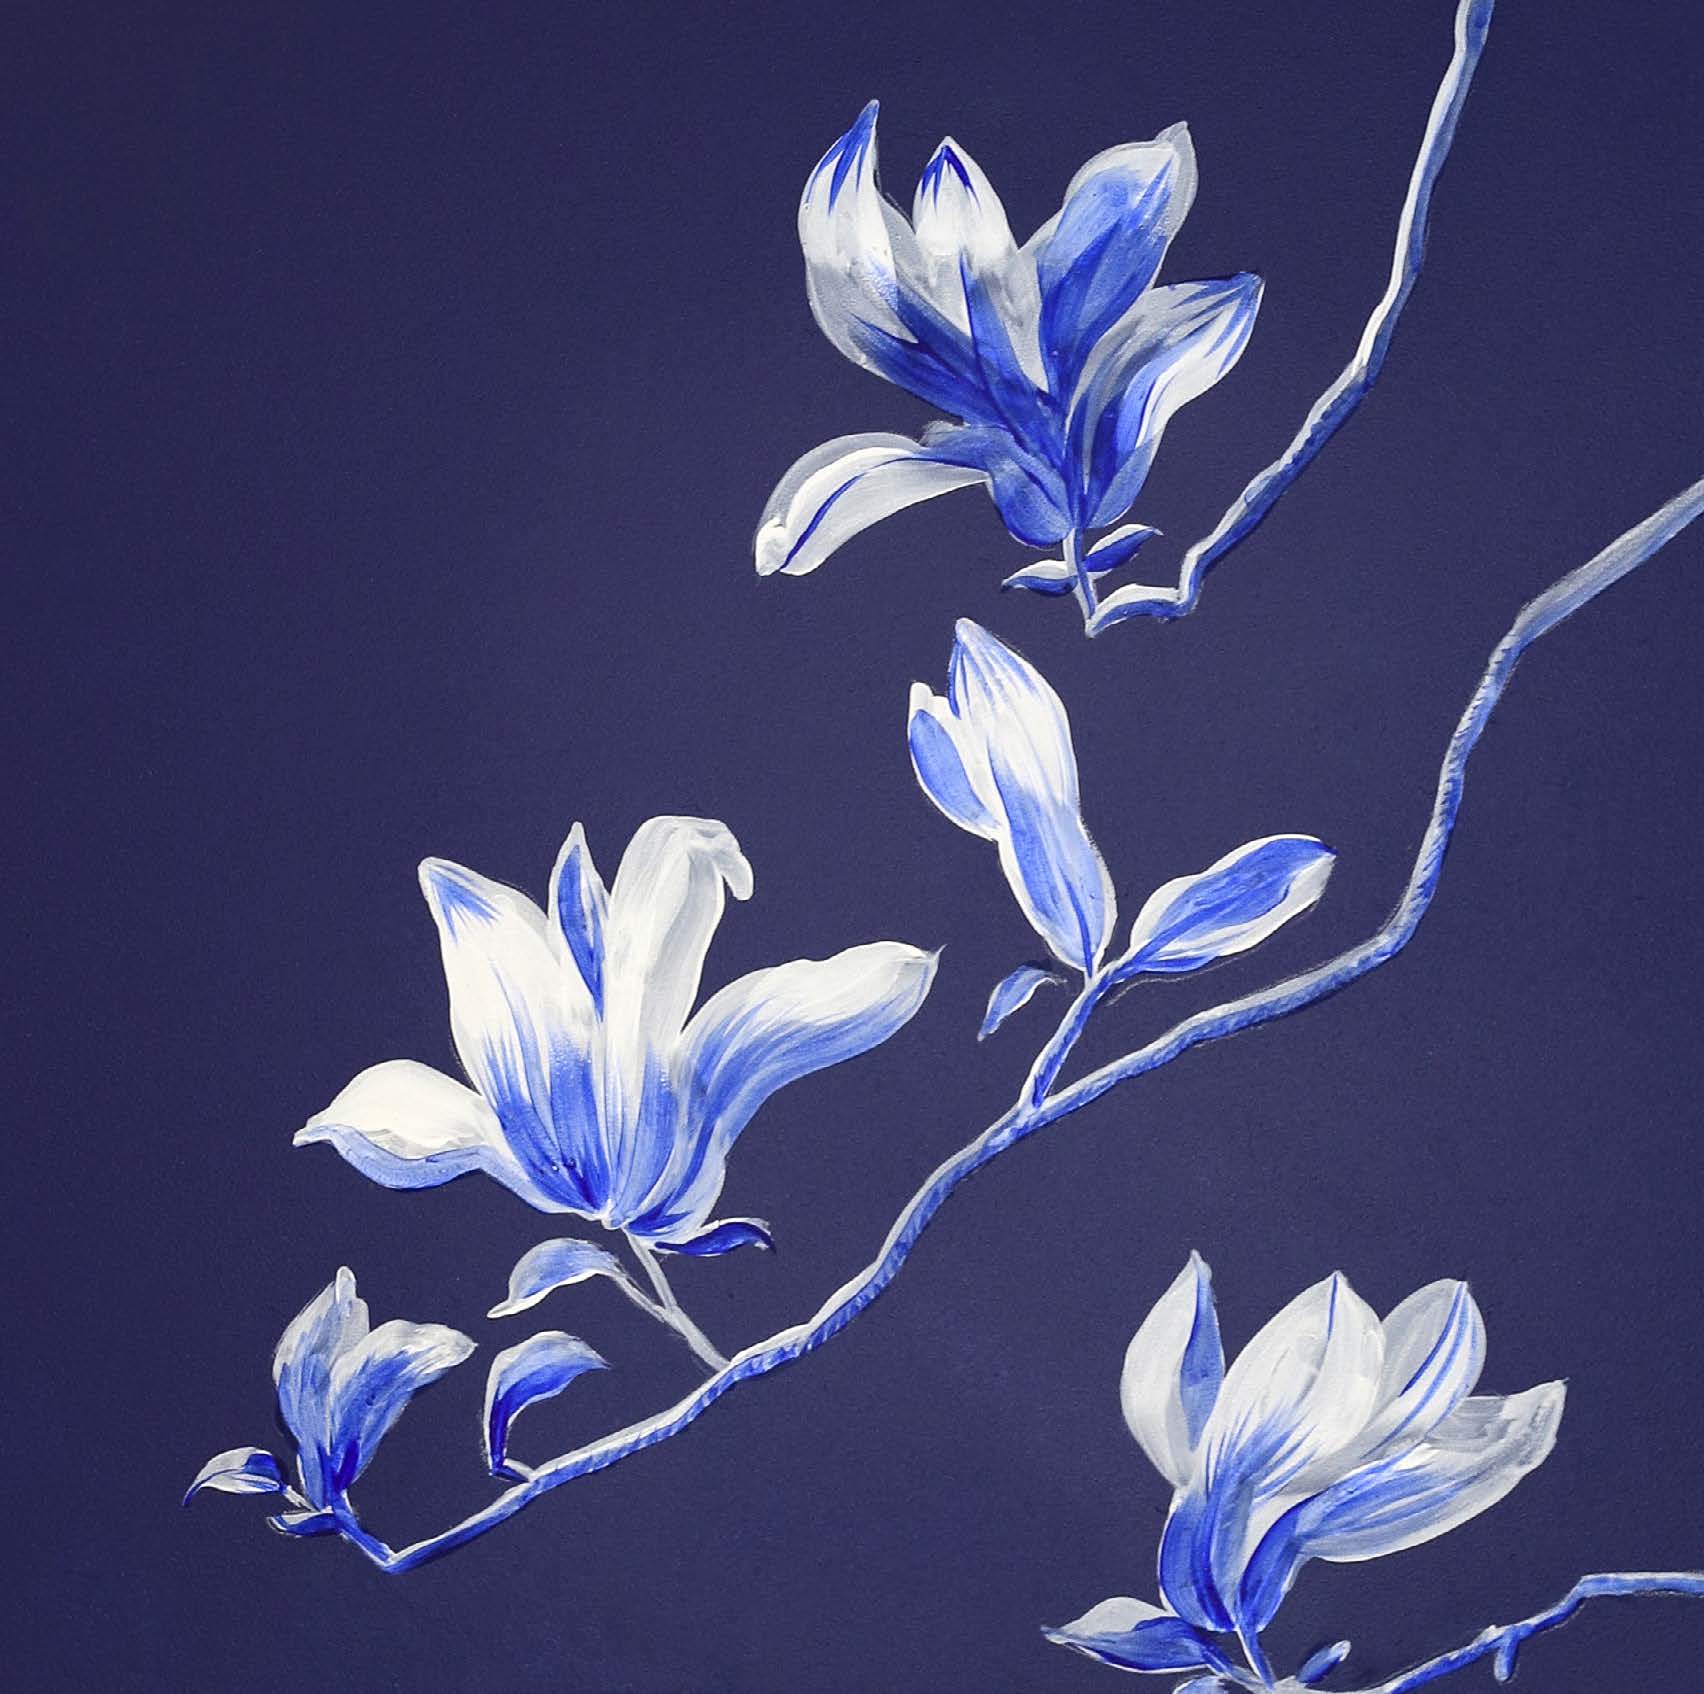
Not sure how to make a living as a fine artist, Deanne Lenehan decided she would become an art teacher like her grandmother who had nurtured her talent from an early age. During her first year of teaching a friend requested a mural for her daughter’s room. She loved being able to paint and be her own boss so she was sold immediately. Lenehan Studios specializes in unique and innovative painted solutions for interiors which include faux finishes, murals, custom fine art, and more. She loves to collaborate with interior designers and clients alike to create unique and beautiful spaces that will be enjoyed for years. Lenehan has served clients across the mid-Atlantic and loves to travel wherever the project may take her. See more of her extensive portfolio at lenehanstudios.com. Connect with her on Instagram @lenehanstudios.

Learn more about Deanne in our Behind the Texture artist feature series.

More from this artist

Looking for more inspiration? Click here to view all of the decorative finishes from our Limited Edition Collections.

Decorative Finish: Urban Concrete

"Urban Concrete" by Studio By Shauna, Inc.
DECORATIVE FINISH HOW-TO

Urban Concrete

Artist: Studio by Shauna, Inc.

Share this article

PROJECT SUPPLIES:

INSTRUCTIONS:

Simulate the look of concrete on vertical surfaces with ease, and add polish with a silver glint in the overlay. Modern, organic looking, and industrial chic! This finish is fantastic on architectural features such as fireplaces.

1 | Mix Sandstone (Untinted) and Sandstone Purple Agate at a ration of 3:1.

2 | Apply Sandstone all over the surface with a trowel, finishing off the direction of the trowel marks vertically. Trowel this layer smoothly and evenly with minor texture. Allow to dry.
(Photo 1)

3 | Mix a glaze with Glazing Medium and Slow Dry Fluid Acrylic Van Dyke Brown, Slow Dry Fluid Acrylic Carbon Black and a little Slow Dry Fluid Acrylic Titanium White to create a warm mid-tone gray, about a 6 out of 10 in darkness on a gray scale.

4 | Sand the surface lightly to smooth texture and seal the pores of the Sandstone. Spray surface with the water/glaze mixture and even out with a large brush. Apply the gray glaze with a mini roller, finishing off the rolling pattern vertically to minimize pattern. Using a large brush, brush through the glaze vertically a couple of times, offloading the brush on the towel if it becomes loaded with glaze. Then brush through the glaze horizontally to negate any vertical patterning that may be in the glaze, and finish with a final softening of the glaze in the vertical direction. The result should be an even veil of gray color. Allow to dry.
(Photo 2)

5 | Create a mixture of Soapstone and Pre-Mixed Metallic Paint Bright Silver, using a ration of 3:1. Tone the mixture slightly by adding about 5-10% of the above gray glaze mixture. Add an additional 5% Glazing Medium. Using a blue blade spatula or Japan scraper, apply the mixture to the wall and scrape off in vertical movement, leaving a slight haze on the surface.
(Photo 3)

6 | Allow to dry. Here is the completed finish.
(Photo 4)

Note: The metallic in this finish is subtle and adds a designer appeal. For a more authentic concrete finish without the metallic sheen, omit Bright Silver in the Soapstone mix and add a small amount of white with the gray glaze instead. Additionally, this finish is a deeper toned concrete. For a natural light concrete color, use Sandstone Untinted only, omitting the Purple Agate. All other steps remain the same.

Featured Products

Studio By Shauna, Inc.

About the Artist
An artist celebrating over thirty years in the interior design industry, Shauna Oeberst Gallagher found her niche in the world of decorative finishing, marrying her love for both painting and interiors. With an education in Fine Art, and a degree in Interior Architecture, she started her career as an interior designer, then opened her decorative art business 24 years ago. Her work has graced many of the finest homes and businesses in Northern California in styles ranging from historical to contemporary. After teaching at local colleges for several years, she co-founded a decorative art school in 2004 and also began teaching nationally at events and conventions. Shauna has taught well over 1000 students throughout her career, as well as been published by Sunset books, contributed to DIY channel’s House Crashers, and consulted for HGTV on numerous projects. Teaching other artists to excel and enhancing their ability to create beauty in the world is a passion Shauna will continue with soulful direction. Shauna’s greatest joy is being mom to her twins, who motivate and inspire her to thrive in her business of creating sanctuary spaces for clients and making art that creates a connection with the viewer.

More from this artist

Looking for more inspiration? Click here to view all of the decorative finishes from our Limited Edition Collections.

Decorative Finish: Spring Rain

"Spring Rain" by Studio By Shauna, Inc.
DECORATIVE FINISH HOW-TO

Spring Rain

Artist: Studio by Shauna, Inc.

Share this article

PROJECT SUPPLIES:

INSTRUCTIONS:

Modern Organic and Boho Chic … A shimmery finish in fresh colors from nature, reminiscent of a wet window on a rainy spring day. A perfect finish for an accent wall or for a small space that begs for an artsy atmosphere. This subjective finish can be as quiet or as active as you choose, depending on how much dripping and shimmer you desire.

1 | Mix the Pre-Mixed Metallic Paint Serene with Glazing Medium, 1:3 ratio. Mix Pre-Mixed Metallic Paint White Veil with Glazing Medium, 1:3 ratio. Fill a spray bottle with water, and add 10% glaze.

2 | Spray surface with water mixture and even out with a large chip brush or other wide soft brush to create a slip coat on the surface. Brush on or roll on random swipes of the two colors in a vertical direction, covering the entire surface.
(Photo 1)

3 |Using a 6″ lime wash or a stain brush, sweep over the surface in a vertical motion to soften.

Offload the wet paint on the brush onto a small terry cloth towel. Then, using soft pressure, swipe brush horizontally to blend the edges of the linear pattern and keep it from being too stripey. Finish off with vertical sweeps over the wet section to remove the horizontal brush strokes and to keep the pattern going up and down. The finish should have a blended white and pale green vertical pattern with random movement and softened edges between colors. Allow to dry.
(Photo 2)

4 | Prepare a palette or tray with a small amount of Slow Dry Fluid Acrylic Chromium Oxide Green, Phthalo Green, and Phthalo Blue. Add a dollop each of Pre-Mixed Metallic Paint Bright Silver, Silver, and Reflection. Pour a small amount of the Sheer Glazing Medium onto the palette and also in a small container for dipping into.

5 | Spray the surface with the water/glaze mixture and even out with a wide brush. Dip the tip of a brush into a color and double dip into the Sheer Glazing Medium. Starting at the top of the finish, apply color by pressing the brush down to release the paint load.
(Photo 3)

6 | Spray the glazed area with the water/glaze mix and let drip. Continue with other colors randomly, adding more color and spraying as needed to allow the paint to flow down like rain. Encourage movement by softening in a vertical direction with a badger blender or soft chip brush. Blend color upward towards the top if needed (if too much color has flowed down from the origin point).
(Photos 4-5)

7 | Remove any unwanted drips to refine the composition by swiping over glazed areas with a damp cheesecloth. Add color and drips to your preference, starting at the top of the surface area. Continue until the entire area has color and interest. Allow to dry.

8 | Using the White Veil glaze mixture, overglaze the surface in a vertical fashion, leaving some highs and lows by spraying with the water/glaze mix and by removing some areas with the cheesecloth.
(Photo 6)

9 | Soften with a big chip brush if desired. Add additional White Veil drips as desired. These will add white shimmery rain streaks on the surface. Here is the completed finish.
(Photo 7)

Featured Products

Studio By Shauna, Inc.

About the Artist
An artist celebrating over thirty years in the interior design industry, Shauna Oeberst Gallagher found her niche in the world of decorative finishing, marrying her love for both painting and interiors. With an education in Fine Art, and a degree in Interior Architecture, she started her career as an interior designer, then opened her decorative art business 24 years ago. Her work has graced many of the finest homes and businesses in Northern California in styles ranging from historical to contemporary. After teaching at local colleges for several years, she co-founded a decorative art school in 2004 and also began teaching nationally at events and conventions. Shauna has taught well over 1000 students throughout her career, as well as been published by Sunset books, contributed to DIY channel’s House Crashers, and consulted for HGTV on numerous projects. Teaching other artists to excel and enhancing their ability to create beauty in the world is a passion Shauna will continue with soulful direction. Shauna’s greatest joy is being mom to her twins, who motivate and inspire her to thrive in her business of creating sanctuary spaces for clients and making art that creates a connection with the viewer.

More from this artist

Looking for more inspiration? Click here to view all of the decorative finishes from our Limited Edition Collections.

Decorative Finish: Metallic Faux Bois

"Metallic Faux Bois" by Studio By Shauna, Inc.
DECORATIVE FINISH HOW-TO

Metallic Faux Bois

Artist: Studio by Shauna, Inc.

Share this article

PROJECT SUPPLIES:

INSTRUCTIONS:

Modern take on a classic simple graining finish. The gold, bronze, and silver tones gives this finish design flexibility while the clean lines and metallic sheen add a contemporary flair. From mid-century modern to classical design that is transitioning into contemporary, this rich finish adds drama and sophistication to any space whether it’s applied on a wall, furniture piece, or cabinetry.

1 | Base coat surface with Pre-Mixed Metallic Paint Roman Gold.

2 | Mix Slow Dry Fluid Acrylic Van Dyke Brown Hue with Glazing Medium to create a rich brown glaze.

3 | Roll a thin layer of Sheer Glazing Medium all over the surface to provide a slip coat for the glaze. Apply Van Dyke Brown Hue glaze mixture all over the surface with a mini roller, finishing off the roller in the direction the grain will go. Using a flogger, lay the brush flat against the surface and drag through the the glaze creating a stria effect.
(Photo 1)

4 | Vary the pressure to create different qualities of the stripes, some wider, some thinner, some with more glaze and some with less. Allow to dry.
(Photo 2)

5 | Mix the Pre-Mixed Metallic Paint Oiled Bronze with a combination of Glazing Medium and Sheer Glazing Medium to create a semi-opaque glaze, approximately a 25-30% ratio of paint to glaze.

6 | Spray surface with the water/glaze mixture and brush through with a large brush to even out. Apply Oiled Bronze glaze all over the surface with a mini roller, finishing off the roller in the direction the grain will go. Using a flogger, drag through the glaze quickly in the same direction as the existing stria, using light pressure to remove some of the glaze to create a slight stria effect.

7 | Offload the brush on a small terrycloth towel, then flog about 60% of the the glazed area by slapping the brush repeatedly and moving the brush in small increments up the grain. Soften glaze slightly with a badger blender or a double thick chip brush. Allow to dry.
(Photo 3)

8 | Create a glaze with Pre-Mixed Metallic Paint Moon Dust and Sheer Glazing Liquid, using about a 25-30% ratio of paint.

9 | Roll a thin layer of Sheer Glazing Medium all over the surface to provide a slip coat for the glaze. Roll a sheer veil of Moon Dust glaze all over the surface. Holding a cheesecloth in your hand like a pad, apply it to the surface with a bit of pressure from your fingers on the glazed surface. Pull through the glaze in the direction of the grain, allowing the pressure of your fingers to lift more glaze in those areas, creating an organic striped veil.
(Photo 4)

10 | Soften with a large chip brush. Flog the glaze here and there. Soften again if needed. Allow to dry.
(Photo 5)

Note: For a slightly grayer and softer version of this finish, reverse the order of the first two paint colors, applying the Oiled Bronze first, and the Van Dyke Brown second. This will result in a cooler-toned finish, and a less brown finish, while allowing the Moon Dust veil to be more prominent in softening the overall appearance.

11 | For furniture and cabinetry, protect the finish with a coat of Clear Topcoat Satin. Here is the finalized texture.
(Photo 6)

Featured Products

Studio By Shauna, Inc.

About the Artist
An artist celebrating over thirty years in the interior design industry, Shauna Oeberst Gallagher found her niche in the world of decorative finishing, marrying her love for both painting and interiors. With an education in Fine Art, and a degree in Interior Architecture, she started her career as an interior designer, then opened her decorative art business 24 years ago. Her work has graced many of the finest homes and businesses in Northern California in styles ranging from historical to contemporary. After teaching at local colleges for several years, she co-founded a decorative art school in 2004 and also began teaching nationally at events and conventions. Shauna has taught well over 1000 students throughout her career, as well as been published by Sunset books, contributed to DIY channel’s House Crashers, and consulted for HGTV on numerous projects. Teaching other artists to excel and enhancing their ability to create beauty in the world is a passion Shauna will continue with soulful direction. Shauna’s greatest joy is being mom to her twins, who motivate and inspire her to thrive in her business of creating sanctuary spaces for clients and making art that creates a connection with the viewer.

More from this artist

Looking for more inspiration? Click here to view all of the decorative finishes from our Limited Edition Collections.

Decorative Finish: Boho Tones

DECORATIVE FINISH HOW-TO

Boho Tones

Artist: Studio by Shauna, Inc.

Share this article

PROJECT SUPPLIES:

INSTRUCTIONS:

Texture, sheen, and color… mixing it up for an updated finish that will accent any space with a vibe that’s designed AND relaxed. A matte woven wall finish with metallic threads underneath, topped with a mandala that is designed to both disappear and pop. Sexy, earthy, and playful in a colorful monochromatic style.

1 | Base coat surface with Golden Paintworks Pre-Mixed Metallic Paint Splendor. This layer will be a glimmer in the background of the “woven” texture, so it is not necessary to be concerned with roller lines.

2 | Mix 5% Glazing Medium and 5% Matting Additive to the Venetian Plaster.

3 | It is recommended to panel off the walls, plastering every other panel at a time. Apply the Venetian Plaster to the wall panel evenly.
(Photo 1)

4 | While wet, brush through the section horizontally and vertically with the wallpaper brush creating a woven texture. Offload brush on a terry cloth towel as needed.
(Photo 2) 

5 | Then, using the trowel at about a 45 degree angle and with very light pressure, knock down the weave here and there, creating an uneven ‘worn’ look. Areas with the weave will have thin “threads” of metallic color that the light will capture, while the knocked down areas will be smoother, like a time worn fabric.
(Photo 3)

6 | Continue technique on the alternating panels. Allow them to dry. Next, back tape completed panels and repeat technique on the remaining panels to be textured. Allow to dry.

7 | Create three color mixes for the stencil. Mix Glazing Gel and Pre-Mixed Metallic Paint Splendor in a ration of 2:1. Then add 5-10% Glazing Medium. Do the same with Pre-Mixed Metallic Paint Obsession and with Pre-Mixed Metallic Paint Roman Gold.
(Photo 4)

8 | Mark off the area on the wall where the stencil will go using painters tape. Spray the back of the stencil with the 3M Super 77 Spray Adhesive and wait about a minute or two. When tacky, apply to the marked area and smooth the stencil down onto the plastered surface using your hands to make sure that all the small areas are flush with the wall surface. It is recommended to use tape and paper around the outside of the stencil to avoid getting the metallic colored gel on the background.

9 | Starting in the center, apply the Gold mixture using a blue blade spatula or Japan scraper. This color should extend in diameter about 25%, keeping in mind you will overlap the edge and blend this with the next color.
(Photo 5)

10 | Next, apply the Splendor mixture, overlapping the gold slightly, 1-2 inches. Apply the Splendor mixture to extend about halfway out from the diameter of the design. Lastly, apply the Obsession mixture to the outer half of the design, overlapping with the Splendor mixture 2 to 3 inches.
(Photo 6)

11 | Before removing the stencil, pull the wallpaper brush through the design horizontally, creating a texture. Offload brush if necessary. It is ok to have highs and lows in the depth of the gel, as it will create the relaxed appearance of the finish.
(Photo 7)

12 | Remove the stencil and allow this half of the mandala to dry. Once dry, and before you paper off the completed half of the design, line up the stencil, noting the areas on the stencil where you will extend each color. Be mindful to extend the colors to the same area/diameter as the first half so that the tones match up.
(Photo 8)

13 | After applying the Glazing Gel colors, brush through with the wallpaper brush horizontally. Peel off the stencil and allow to dry. Here is the final finish
(Photo 9)

Featured Products

Studio By Shauna, Inc.

About the Artist
An artist celebrating over thirty years in the interior design industry, Shauna Oeberst Gallagher found her niche in the world of decorative finishing, marrying her love for both painting and interiors. With an education in Fine Art, and a degree in Interior Architecture, she started her career as an interior designer, then opened her decorative art business 24 years ago. Her work has graced many of the finest homes and businesses in Northern California in styles ranging from historical to contemporary. After teaching at local colleges for several years, she co-founded a decorative art school in 2004 and also began teaching nationally at events and conventions. Shauna has taught well over 1000 students throughout her career, as well as been published by Sunset books, contributed to DIY channel’s House Crashers, and consulted for HGTV on numerous projects. Teaching other artists to excel and enhancing their ability to create beauty in the world is a passion Shauna will continue with soulful direction. Shauna’s greatest joy is being mom to her twins, who motivate and inspire her to thrive in her business of creating sanctuary spaces for clients and making art that creates a connection with the viewer.

More from this artist

Looking for more inspiration? Click here to view all of the decorative finishes from our Limited Edition Collections.

Decorative Finish: Metallic Floral

"Metallic Floral" by Cecelia Claire.
DECORATIVE FINISH HOW-TO

Metallic Floral

Artist: Cecelia Claire

Share this article

PROJECT SUPPLIES:

INSTRUCTIONS:

1 | On a surface that has been primed and gessoed and applied with two coats of Metallic Paint Tint Base Pearl, create gestural petal shapes using Pre-Mixed Metallic Paint Splendor and a large round brush and/or filbert brush.
(Photo 1)

2 | Use a round brush to create the stems. To create gestural leaves, start with pressure and lift to a point as the stroke continues.
(Photo 2)

3 | Use a fan brush at the top and bottom of the petals to create shadows, highlights and contrast.
(Photo 3)

4 | Use the round brush to add detail such as the stamen or shading on the leaves. Here is the completed finish.
(Photo 4)

Featured Products

Cecelia Claire

About the Artist
Offering a fresh reimagining of the traditional decorative painter, Cecelia creates hypercustomized handpainted surfaces for residences, retail and hospitality. Her creations include bespoke murals and wallcoverings on a variety of substrates including silk and gold foil, as well as digitally printed wallpaper and textiles from original painted designs.

Learn more about Cecelia in our Behind the Texture artist feature series.

More from this artist

Looking for more inspiration? Click here to view all of the decorative finishes from our Limited Edition Collections.

Decorative Finish: Misty Landscape

"Misty Landscape" by Cecelia Claire.
DECORATIVE FINISH HOW-TO

Misty Landscape

Artist: Cecelia Claire

Share this article

PROJECT SUPPLIES:

INSTRUCTIONS:

1 | Set up a palette with the latex interior paint, a dot of Slow Dry Fluid Acrylic Raw Umber, and the Glazing Medium, as pictured.
(Photo 1)

2 | Mix the Raw Umber into the interior paint and the Glazing Medium. Add Titanium White mural paint to the palette. Add Glazing Medium to the Titanium White.
(Photo 2)

3 | On a surface primed with interior primer or gesso, create a blended gradient using a large brush, with more white and cloud shapes at the top. Blend out the edges to create a soft effect.
(Photo 3)

4 | Using a mid-tone blend of paints from your palette, create a foreground. Begin to create a treeline on the foreground.
(Photo 4)

5 | Blend thin coats of darker paint mix into the clouds for shadows, and thin coats of lighter paint mix as a “mist” on the treeline.
(Photo 5)

6 | Using mid-tones painted on with a round brush, continue to add detail. Extend the treeline, add middle ground trees, and foreground plants. Use more contrast as you get closer to the foreground.
(Photo 6)

7 | Continue adding detail by creating shadows from a darker paint blend, and using thin coats of a lighter paint blend with plenty of Glazing Medium to create a misty glaze.
(Photo 7)

8 | Add high-contrast foreground detail using Slow Dry Fluid
Acrylic Raw Umber and Titanium White – no blending necessary.
Here is the completed finish.
(Photo 8)

Featured Products

Cecelia Claire

About the Artist
Offering a fresh reimagining of the traditional decorative painter, Cecelia creates hypercustomized handpainted surfaces for residences, retail and hospitality. Her creations include bespoke murals and wallcoverings on a variety of substrates including silk and gold foil, as well as digitally printed wallpaper and textiles from original painted designs.

Learn more about Cecelia in our Behind the Texture artist feature series.

More from this artist

Looking for more inspiration? Click here to view all of the decorative finishes from our Limited Edition Collections.

Decorative Finish: Metallic Chinoiserie

"Metallic Chinoiserie" by Cecelia Claire.
DECORATIVE FINISH HOW-TO

Metallic Chinoiserie

Artist: Cecelia Claire

Share this article

PROJECT SUPPLIES:

INSTRUCTIONS:

1 | Coat the surface in latex house paint with included primer. Once it has dried, paint leaf and stem shapes using the two green tones, and flowers in two red/pink tones and white.
(Photo 1)

2 | Using Slow Dry Fluid Acrylic Titanium White, create highlights on the leaves, darker petals and stems. The highlights will create a “glow” effect. You can also mix the Titanium White into the metallic paints and Slow Dry Fluid Acrylics to achieve mid-tones.
(Photo 2)

3 | On the white flowers, add light pink tones using Golden Paintworks Pre-Mixed Metallic Paint Splendor with a filbert brush or round brush. Reinforce light areas of the petals with another layer of Slow Dry Fluid Acrylic Titanium White.
(Photo 3)

4 | Add depth and contrast to the ligher pink tones using Pre-Mixed Metallic Paint Vintage Copper. Continue adding detail – light lines on dark areas, dark lines on light areas, until the desired effect is reached.
(Photo 4)

5 | Here is the completed finish.
(Photo 5)

Featured Products

Cecelia Claire

About the Artist
Offering a fresh reimagining of the traditional decorative painter, Cecelia creates hypercustomized handpainted surfaces for residences, retail and hospitality. Her creations include bespoke murals and wallcoverings on a variety of substrates including silk and gold foil, as well as digitally printed wallpaper and textiles from original painted designs.

Learn more about Cecelia in our Behind the Texture artist feature series.

More from this artist

Looking for more inspiration? Click here to view all of the decorative finishes from our Limited Edition Collections.

Decorative Finish: Blue & White Magnolias

"Blue & White Magnolias" by Cecelia Claire.
DECORATIVE FINISH HOW-TO

Blue & White Magnolias

Artist: Cecelia Claire

Share this article

PROJECT SUPPLIES:

INSTRUCTIONS:

1 | On a surface primed and roller-coated with two coats of Golden Paintworks Mural & Theme Paint Royal Blue, sketch a blossom and branch design with a white chalk pencil.
(Photo 1)

2 | Using a round brush, fill the outlines of the sketch in with Golden Paintworks Mural & Theme Paint Titanium White. Allow to dry.
(Photo 2)

3 | Rinse and dry the round brush and use a thin coat of Slow Dry Fluid Acrylic Ultramarine Blue to create the volume and contrast of the petals.
(Photo 3)

4 | Continue with a thin coat on the stems and leaves, leaving some white at the top of the shapes for contrast.
(Photo 4)

5 | Add darker, contrasting detail along the branches and petals using a narrow line of Slow Dry Fluid Acrylic Ultramarine Blue applied thickly with a liner brush. “Erase” any stray chalk lines by re-applying the Golden Paintworks Mural & Theme Paint in Royal Blue over those areas.
(Photo 5)

6 | Here is the completed finish.
(Photo 6)

Featured Products

Cecelia ClaireAbout the Artist
Offering a fresh reimagining of the traditional decorative painter, Cecelia creates hypercustomized handpainted surfaces for residences, retail and hospitality. Her creations include bespoke murals and wallcoverings on a variety of substrates including silk and gold foil, as well as digitally printed wallpaper and textiles from original painted designs.

Learn more about Cecelia in our Behind the Texture artist feature series.

More from this artist

Looking for more inspiration? Click here to view all of the decorative finishes from our Limited Edition Collections.

Decorative Finish: Harlequin Diamond

DECORATIVE FINISH HOW-TO

Harlequin Diamond

Artist: Linette Pedigo

Share this article

PROJECT SUPPLIES:

INSTRUCTIONS:

1 | Draw out harlequin diamond pattern with pencil and ruler to fit space. Take 3/8 inch painters tape to tape off shapes along the pencil lines.
(Photo 1)

2 | Roll on a coat of Fresco with the mini roller, trying to maintain a similar thickness throughout, with a stippled texture created by the roller.
(Photo 2)

3 | While the Fresco is still wet, take the Japanese scraper trowel and lightly trowel the Fresco to created a soften looks with movement and some stipple. Remove tape when still wet and wait to dry completely.
(Photo 3)

4 | Once dry, base coat entire area with SW 6070 Herron Plume.

5 | Mix 1 part SW 6184 Austere Gray to 2 parts of Golden Glazing Medium. Use the chip brush and the damp cotton rag to glaze the entire finish, paying attention to getting the glaze down into the recessed lines. Let dry.
(Photo 4)

6 | Mix 1 part SW 7024 Functional Gray to 4 parts of Golden Glazing Medium. Use the chip brush and the damp cotton rag to glaze the entire finish, paying attention to getting the glaze down into the recessed lines. Let dry.
(Photo 5)

7 | Mix 1 part SW 6430 Great Green to 4 parts of Golden Glazing Medium. Use the chip brush and the damp cotton rag to apply to areas here and there.
(Photo 6)

8 | Here is the final finish.
(Photo 7)

Featured Products

About the Artist
Artist Linette Pedigo began her professional career a little differently than most. Upon receiving her B.A. in Studio Art from Indiana University in 2003, she immediately began painting murals and applying faux finishes in builders’ model homes, private residences and businesses around central Indiana. In 2009, after many years of success, Linette formed her company, Linette’s Painting & Fine Art LLC, where she took her decorative painting skills to the next level. From large-scale murals to exquisite, hand-applied faux finishes, Linette uses her expertise in color theory and technique to always put forth a fantastic finished product. Now, with almost 20 years in the business, Linette has clients all around the United States that love her modern and artistic take on projects, always staying up to date on trends, products and color palettes. 

Learn more about Linette in our Behind the Texture artist feature series.

Looking for more inspiration? Click here to view all of the decorative finishes from our Limited Edition Collections.